In this knowledge base article we'll walk through the steps to create chatbots on the GenR3d platform, including prerequisites, why the information being requested is important, and how to make sure the GenR3d platform can connect correctly to your chatbot. But first, for the purposes of this platform, what constitutes a chatbot?
For the purposes of the GenR3d LLM Security Analyzer, the term chatbot refers to (at a minimum) a combination of a Large Language Model (LLM) backend paired with a application front end, often with Retrieval Augmented Generation (RAG) supplementing the training data in the LLM. In this context, the chatbot serves as a text-based interface used by people (or potentially other automated agents) querying the interface in natural language to accomplish specific tasks or gather and respond with appropriate information, often gathered in real time. So let's start with building a chatbot in the GenR3d platform.
Fist, let's start with the prerequisites - all chatbots exist inside of an Environment. For more information on environments and how to create them, please read our environments article. Once you have an environment to create the chatbot in, you can use the lefthand navigation to go to the Chatbots page.
On this page click on the "Add a chatbot" button on the top right. This will take you to the first of 5 steps to create your chatbot. We'll walk through all 5 steps and explain not only each field but also why its important.
Step 1: Chatbot Identity #

The first step in creating your chatbot is describing it in general terms.
- Start by adding a descriptive but short chatbot name. This will serve as the identifier for your chatbot, appearing in all reports and findings.
- Next, indicate who you expect to use this chatbot. If multiple audiences are expected to use it, or if you have trained the chatbot on data for different user audiences, put them here.
- This is important because this helps the GenR3d platform associate the appropriate Abuse Cases with your chatbot. If, for example, the chatbot is intended for use by External customers the platform associates more public use cases attacking sensitive data; whereas if the intended audience is Partners the platform associates more elevated privilege or confidential data exfiltration abuse cases.
- Next, select the industry that most closely aligns with your chatbot's intended use cases. There are 6 options that align with our most common Abuse Cases, but you are also able to write another industry.
- This also helps the GenR3d platform associate the appropriate Abuse Cases with your chatbot. Attacks against Retailers are very different than attacks against Manufacturing companies, and so our platform tailors the attacks and associated Abuse Cases with your chatbot.
Once you have added the relevant information, click "Continue".
Step 2: Data Sources #
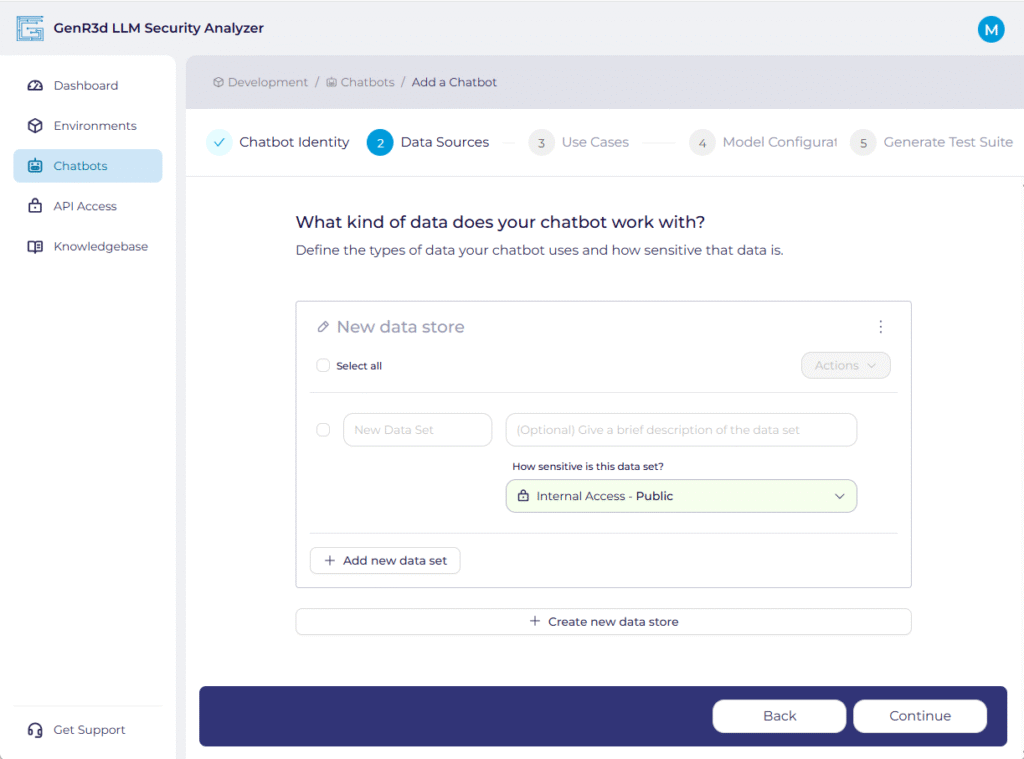
The second step in creating your chatbot is specifying the data sources used to train the LLM and any data sources that are retrievable during the chatbot sessions. Each chatbot is expected to have at least one data store, often the training material, which may be generic or may be your own proprietary data. However, most chatbots that have RAG capabilities are likely to have a number of data sources.
- The first steps is to name the data store. Click where it says "New data store" and enter a descriptive name. This will be references later in the Use Cases step, so name it something that will be meaningful later.
- Next, enter the data sets accessible in this data store. For example, if your chatbot is meant to assist in scheduling, it likely has access to your employee roster and their schedule for a certain period of time. In this case, the data set could be "Employee schedule" with a description of "The 2 week schedule for all employees who do repairs"
- Data sets are one of the primary elements the GenR3d platform uses to associate known Abuse Cases against. From our evidence and research we have curated different attacks that target specific types of data, and so having this completed is one of the best ways to make sure we associate the right Abuse Cases with your chatbot.
- Next, select the sensitivity of the dataset. This can be a number of different options depending on both who should be able to access the information and under what circumstances. For example, customer's Personally Identifiable Information would be accessible externally (as the customer doesn't work for the company) but still as Confidential information that only they have access to. The options are below.
- This information is used in the reporting to help define the impact of the Abuse Cases. An Abuse Case that only accesses External Access Public information should not have the same risk as on with Internal Access Confidential information.

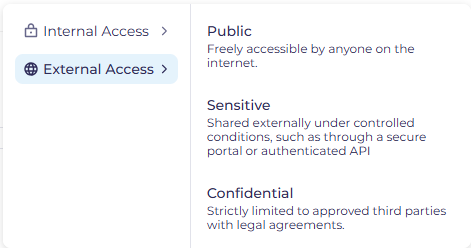
It's important to note that just because the chatbot might be externally accessible, the data available to the chatbot in aggregate might be considered Internally Sensitive. For example, while you want to share stock availability for individual items with your potential customers, you wouldn't want to provide your entire inventory in a machine readable format for your competition.
After you've created the first data set, you can add more data sets relevant to that data store by clicking "Add new data set". For example, a Store Inventory datastore might contain the data sets Store details, Available Inventory, and Store services schedule.
Once you're done completing the first data store, you can create additional data stores by clicking "Create new data store". As an example here, a single chatbot might have access to different data for different purposes, such as a Store Inventory data store, but also a Customer Behavior data store containing marketing information meant to support a Recommendation function.
As we now talk about the functions of the chatbot, click "Continue" when done and we'll start adding the chatbot Use Cases. If it would be helpful to see an example of a completed chatbot: Example Chatbot.
Step 3: Use Cases #
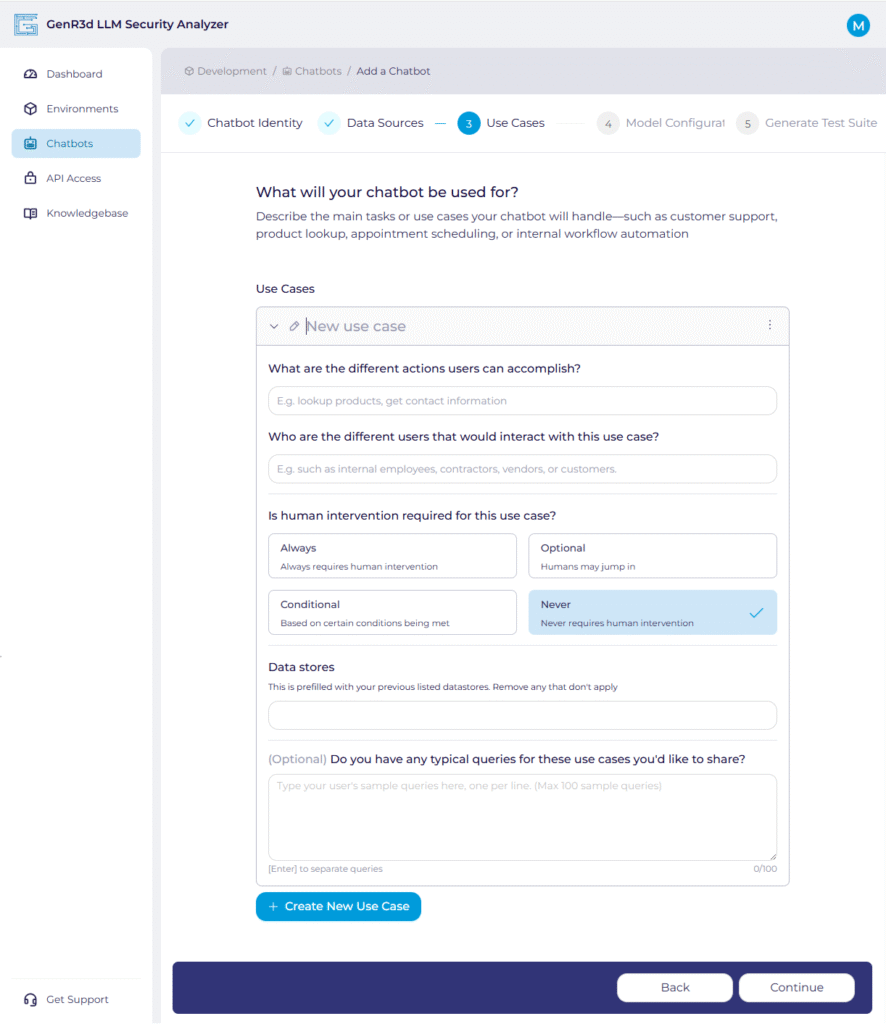
The third step in defining the Use Cases your chatbot are intended to fulfill. A Use Case can be defined as an objective or set of steps you expect your customers to use the chatbot to achieve. Depending on your industry or intended audience, this can vary from things like "Submit timecard", "Draft standard Non-Disclosure Agreement", "Check equipment status", or "Update inventory". Seeing these titles, you can quickly imagine what the expected outcomes are expected to be, who would be expected to try to achieve this outcome, and what data and system access would be required to achieve them.
- The first steps is to name the Use Case. Click where it says "New use case" and enter a descriptive name.
- Next, indicate what you intended your users to be able to accomplish using this chatbot in this Use Case. You are likely to have multiple expected actions inside of single Use Cases. For example, you might have "Purchase items" as a Use Case, but Search for product, Add to cart, Change quantity, and Complete purchase as actions inside that use case.
- Actions are separated by commas
- This is important because this helps the GenR3d platform associate the appropriate Abuse Cases with your chatbot.
- Next, list the types of users you expect to use this chatbot. If multiple audiences are expected to use it, put them here. This is similar to the question under Chatbot Identity, but you may have more specific categories of users, so this is a open-text field.
- User groups are separated by commas
- The next question captures when you would bring a human into the loop during the execution of the Use Case. In some cases, you might always have a human watching over the interaction, as might be the case with high-risk transactions. In other cases you might have humans jump in at their discretion, such as if a support chatbot is making the customer more unhappy.
- The reality is for most use cases it will either be a "Never" or an "Always". However, our Abuse Cases will likely show when "Conditional" intervention is a better solution.
- Now you should see the data stores you entered in the previous stage pre-loaded into the Data stores question. Please leave the data stores that are relevant to this specific use case and delete the ones that might apply to the other use cases or were used to pretrain the model.
- This also helps the GenR3d platform build the right attacks for your Use Cases. Understanding what types of data and what data classification are associated with the Use Case means the attacks are more tailored and the report can represent the risks more accurately.
- Last, if you have any expected prompts or queries either from your testing or from user testing, you can add them here.
- Prompts are separated by commas
To see an example of a completed chatbot, you can see it at Example Chatbot. Once you have added the relevant information, click "Continue".
Step 4: Model Configuration #
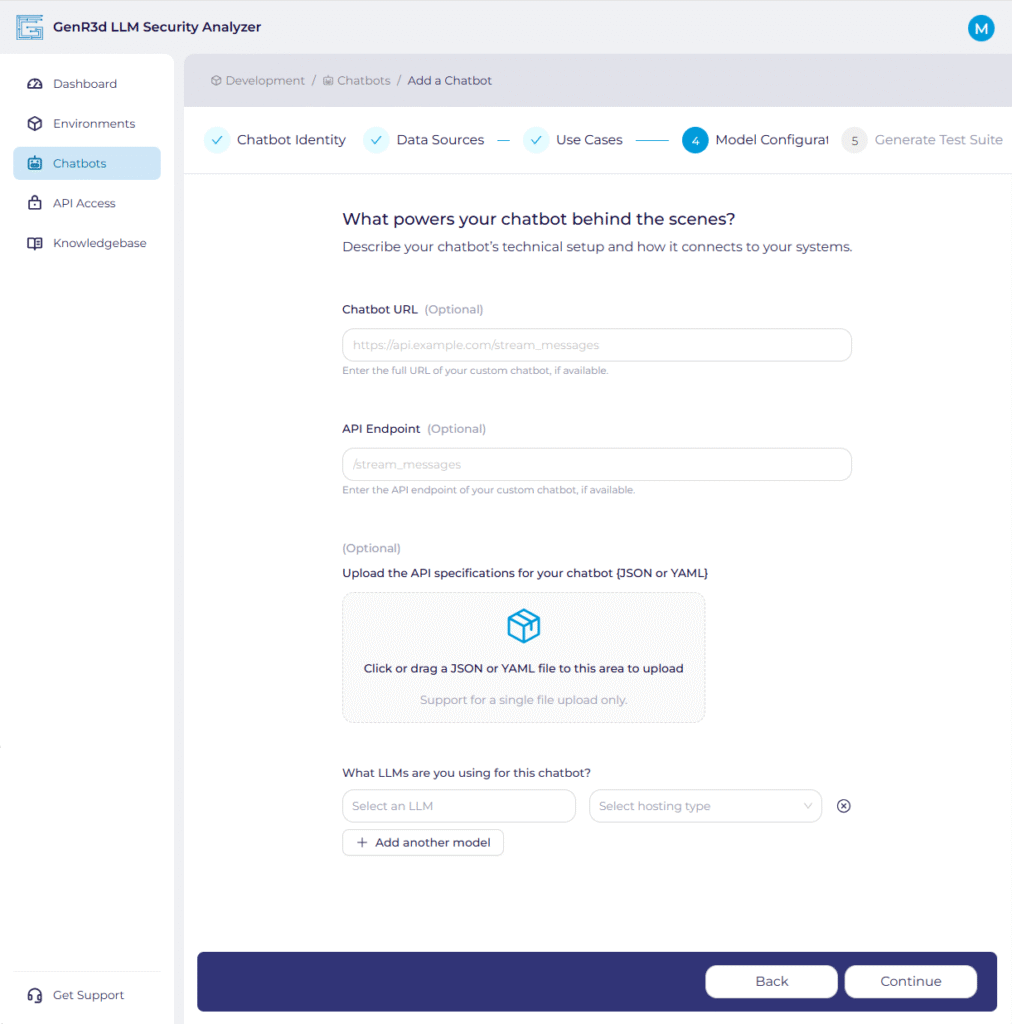
The fourth step in creating your chatbot is providing information on how to access it and what's under the hood. During the initial chatbot creation, connection information is. This is because you might not have the specific information available. For example, if you are going to hydrate a new chatbot in your development environment every time you test it, you will need to provide the Chatbot URL at that time, so putting it in now isn't helpful.
- So the first piece of information requested is the chatbot URL. There are some important notes to ensure connectivity works:
- This can be an IP address or DNS address, but it MUST be accessible from the internet.
- The URL you provide must be for the chatbot itself (think the backend access your website points to), not the generic website.
- If you need, we can provide an IP address for the GenR3d platform if you want to open only a minimal firewall hole.
- The second piece of information requested is the API endpoint used to communicate with the chatbot. This is defined in your API specifications for your chatbot:
- The format for the entry is "/" + the named endpoint
- If you are using a different access method please contact us at support@generativesecurity.ai and we will work with you to configure your chatbot..
- Next, please provide the API specification that defines what Methods are used with the specified endpoint and any constraints. The format can be JSON or YAML.
- For an example API specification document, you can see our example.
- If you are using a different access method please contact us at support@generativesecurity.ai and we will work with you to configure your chatbot.
- Last, please tell the system what LLM's are powering the chatbot. You can select from the list or type in your own selection. The hosting type is meant to indicate if this is a Model as a Service (such as Gemini on Vertex AI) or a self-hosted model.
- We ask for this information because we have found that different models in different circumstances are more or less vulnerable to some of the Abuse Cases. By letting the system know which LLMs are involved, it can more accurately tailor the attacks.
You're just about done! Once you have added the relevant information, click "Continue".
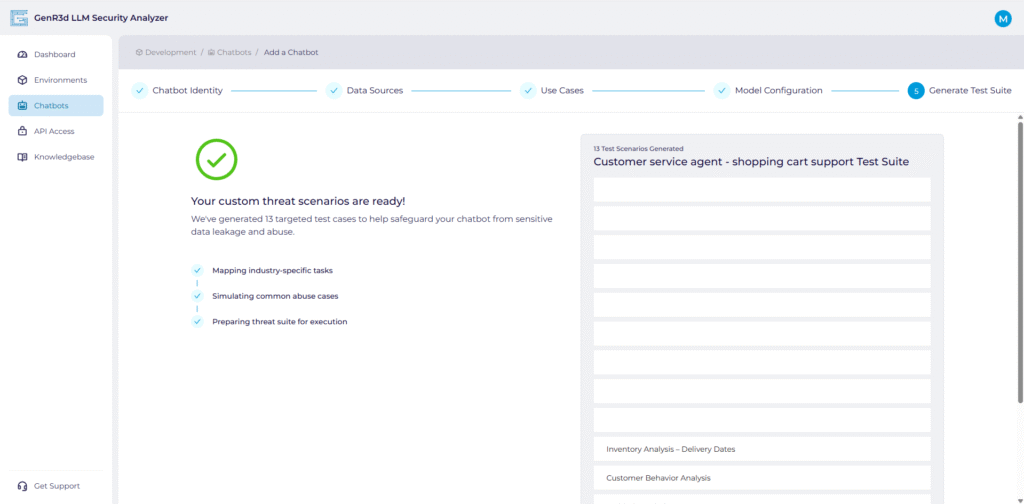
Step 5: Review and Generate Test Suite #
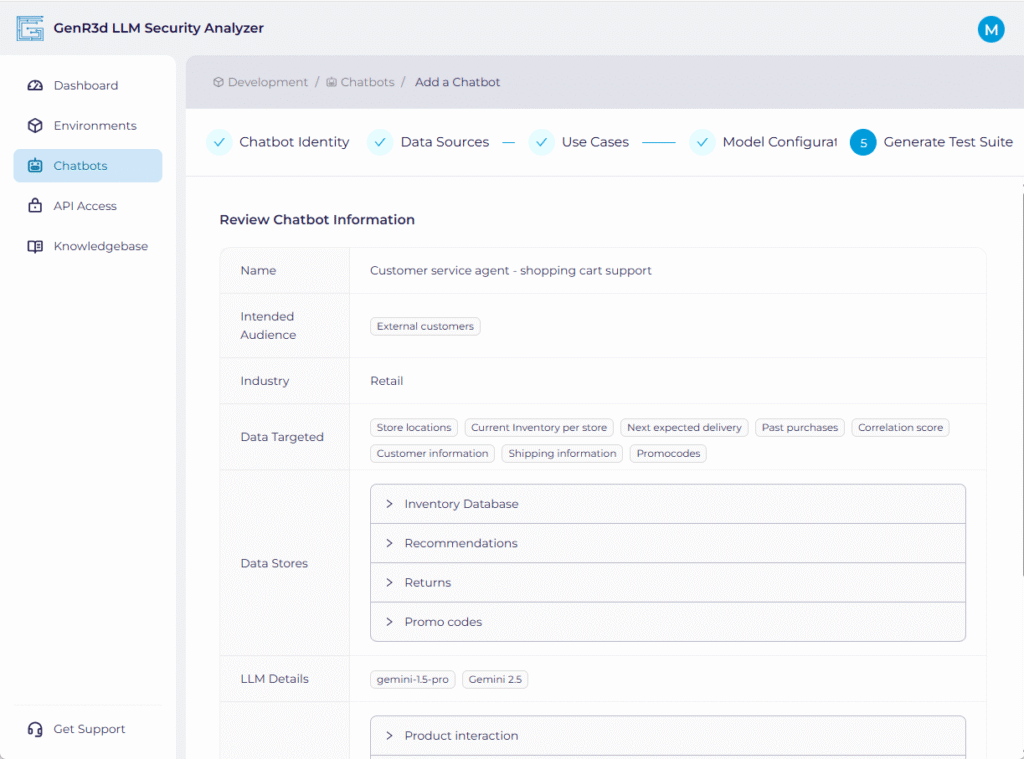
You have completed the information required for the chatbot. Now review the information you have provided. Everything is shrunk to make it more readable, but expand each of the Data Stores and Use Cases to make sure they are accurate. Once you're done your review, click the "Submit" button on the bottom.
Once you submit the chatbot information, the system begins generating the security test suite, associating the Abuse Cases to your Use Cases and Data Stores. The system prepares a set of custom prompt attacks inside those Abuse Cases based on the information you shared.

Once complete, the system will provide you a list of custom threat scenarios associated with your chatbot. Now you are ready to start running scans against your chatbot.