
Automating the extraction of security data ensures that your leadership and security operations teams have visibility into Generative AI risks without needing to log into the GenR3d portal. You can use the /dashboard endpoint to pull high-level health metrics or the /findings endpoint for granular details on specific vulnerabilities into a custom dashboard (like Grafana or Slack)
The most efficient way to get a "snapshot" of your security posture is the GET /dashboard endpoint. This returns aggregate data across all your environments.
API Endpoint: GET /dashboard
cURL Command
curl -X GET "/dashboard" \
-H "x-api-key: YOUR_API_KEY" \
-H "Content-Type: application/json"
You can easily pipe this data into a simple script to alert your team. For example, a Python "helper" could check the `abuse_cases_active` count and post to Slack if it exceeds a certain threshold:
# Conceptual logic for a simple automation
import requests

data = requests.get("https://api.generativesecurity.ai/dashboard", headers={"x-api-key": "YOUR_API_KEY"}).json()

active_threats = data.get('abuse_cases_active', 0)
worst_case = data.get('worst_abuse_case_desc', 'None')

if active_threats > 0:
	print(f"ALERT: {active_threats} active vulnerabilities found. Most common: {worst_case}")
# Trigger Slack Webhook or Email hereIf you need the "raw evidence" for a specific scan to attach to a Jira ticket, you can query the `/findings` endpoint using a specific `scan_id`:
Endpoint: /findings?scan_id={uuid}
This will return the attack_successful status, severity (Critical, High, Medium, Low), and the specific risk description for every test performed during that scan.
In this knowledge base article we'll walk through the steps for updating your chatbots on the GenR3d platform. If you haven't created any chatbots yet, it's best to start with the Chatbots in the GenR3d platform article.
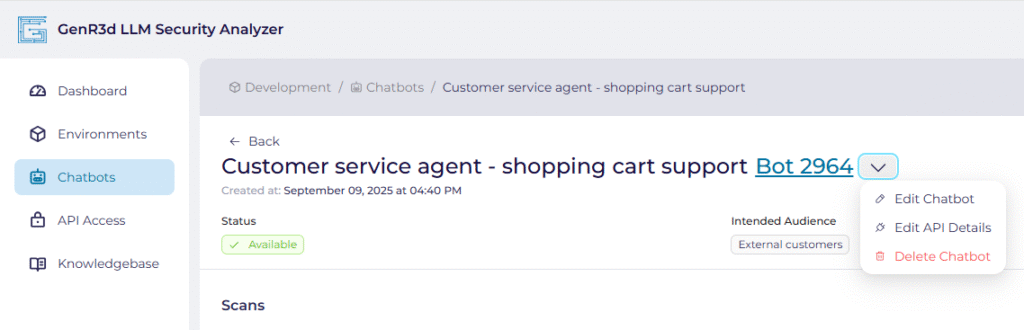
For the first step, open the GenR3d platform and navigate to your chatbot. Then, next to the Bot ID, click the down arrow to show the options, including Edit Chatbot. Click on Edit Chatbot.
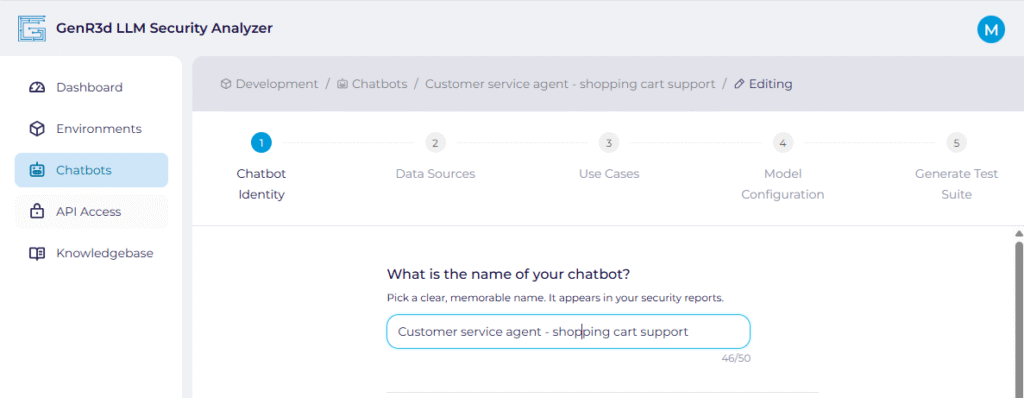
Just like when we were creating our chatbot, we will see the same 5 steps at the top of our screen.
Now we can walk through the same steps we had before, with the exception of updating the chatbot's URL and API information. To understand how to update those, please see the Update your chatbot's URL and API article.
All of your previously populated information will already be in the window. You can make changes to any of the information displayed.
Once you have added the relevant information, click "Continue".
The second set of fields for you chatbot you can update are the data sources used to train the LLM and any data sources that are retrievable during the chatbot sessions. Each chatbot is expected to have at least one data store, often the training material, which may be generic or may be your own proprietary data. Again, all of your previously populated information will already be in the window. You can make changes to any of the information displayed.
Click "Continue" when done and we'll start adding the chatbot Use Cases. If it would be helpful to see an example of a completed chatbot: Example Chatbot.
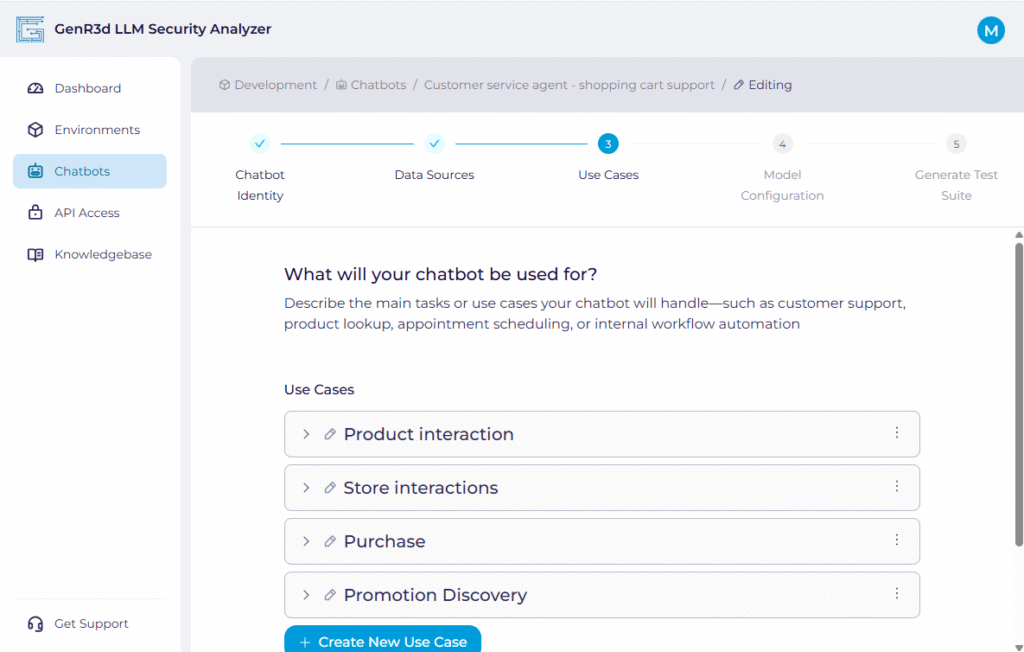
We are now back at the third step: defining your Use Cases. As with before, all of your previously populated information will already be in the window. However, for visual simplicity the Use Cases are flattened. To expand, click on the right-facing arrow on the left hand side. You can make changes to any of the information displayed.
To see an example of a completed chatbot, you can see it at Example Chatbot. Once you are happy you've updated the relevant information, click "Continue".
We are now ready to update the defined LLM's powering the chatbot. Remember, the steps to update the chatbot's URL and API information are found in another window. Please see the Update your chatbot's URL and API article for more information.
You're just about done! Once you have updated the relevant information, click "Continue".
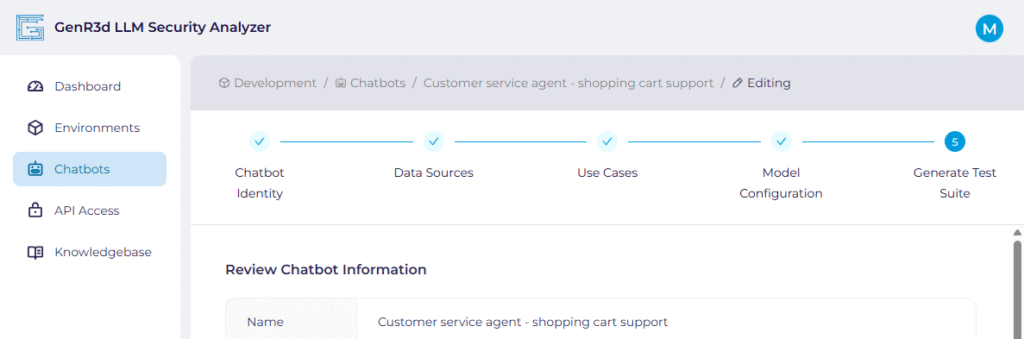
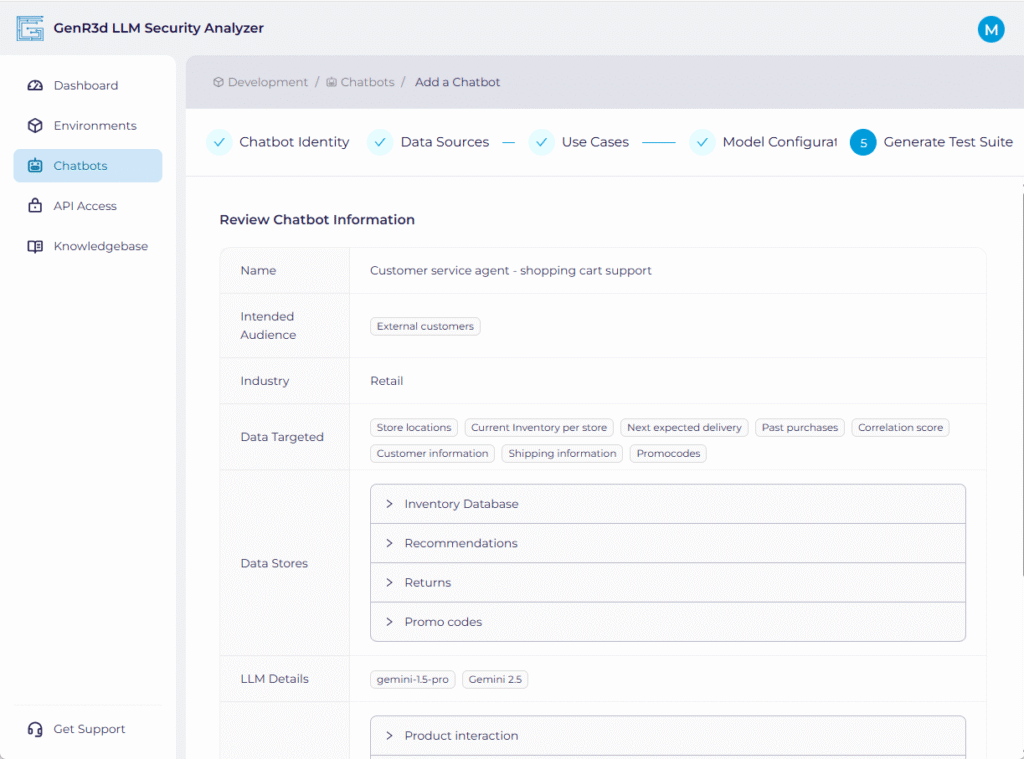
You have completed the information required for the chatbot. Now review the information you have provided. Everything is shrunk to make it more readable, but expand each of the Data Stores and Use Cases to make sure they are accurate. Once you're done your review, click the "Submit" button on the bottom.
Once you submit the chatbot information, the system begins updating the security test suite, associating the Abuse Cases to your Use Cases and Data Stores based on the new information provided.

Once complete, the system will provide you a list of custom threat scenarios associated with your chatbot. Now you are ready to start running scans against your chatbot.
In this knowledge base article we'll walk through the steps to update your chatbot's URL and API information. This is likely to occur each time you instantiate a new version of your chatbot in your development environments. If your chatbot is in production, you shouldn't need to do this too often.
For the first step, open the GenR3d platform and navigate to your chatbot. Then, next to the Bot ID, click the down arrow to show the options, including Edit API Details. Click on Edit API Details.
Now you will see the current URL and API details the GenR3d platform uses to connect to your chatbot.
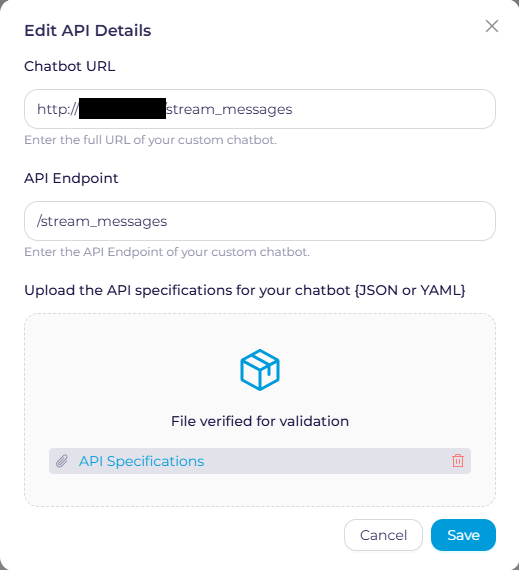
Remember from when you created your chatbot, there are specific ways you need to enter the information.
Now click Save on the bottom. If no changes were made, a warning will show up on top of the screen and you won't be able to use Save, so click Cancel. But if you did make changes, when you click Save you'll see a popup indicating changes are being saved, and then you'll be put back on the chatbot page.
In this knowledge base article we'll walk through the steps to create chatbots on the GenR3d platform, including prerequisites, why the information being requested is important, and how to make sure the GenR3d platform can connect correctly to your chatbot. But first, for the purposes of this platform, what constitutes a chatbot?
For the purposes of the GenR3d LLM Security Analyzer, the term chatbot refers to (at a minimum) a combination of a Large Language Model (LLM) backend paired with a application front end, often with Retrieval Augmented Generation (RAG) supplementing the training data in the LLM. In this context, the chatbot serves as a text-based interface used by people (or potentially other automated agents) querying the interface in natural language to accomplish specific tasks or gather and respond with appropriate information, often gathered in real time. So let's start with building a chatbot in the GenR3d platform.
Fist, let's start with the prerequisites - all chatbots exist inside of an Environment. For more information on environments and how to create them, please read our environments article. Once you have an environment to create the chatbot in, you can use the lefthand navigation to go to the Chatbots page.
On this page click on the "Add a chatbot" button on the top right. This will take you to the first of 5 steps to create your chatbot. We'll walk through all 5 steps and explain not only each field but also why its important.

The first step in creating your chatbot is describing it in general terms.
Once you have added the relevant information, click "Continue".
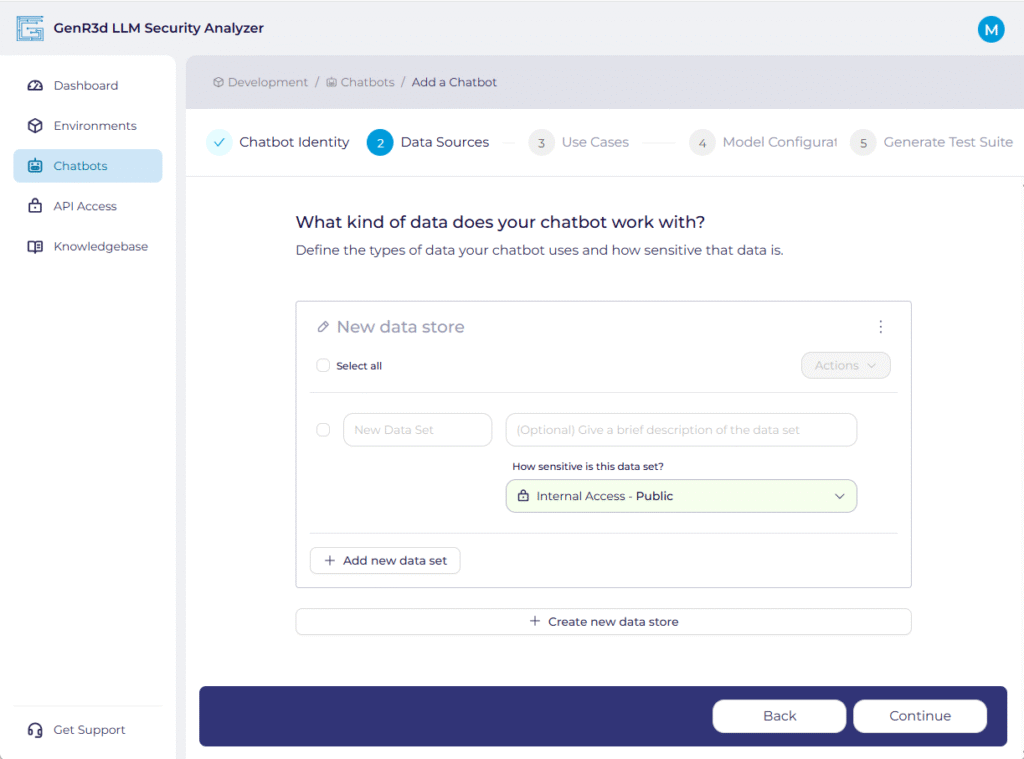
The second step in creating your chatbot is specifying the data sources used to train the LLM and any data sources that are retrievable during the chatbot sessions. Each chatbot is expected to have at least one data store, often the training material, which may be generic or may be your own proprietary data. However, most chatbots that have RAG capabilities are likely to have a number of data sources.

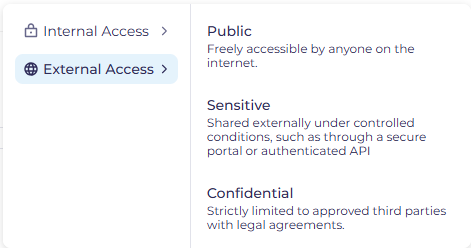
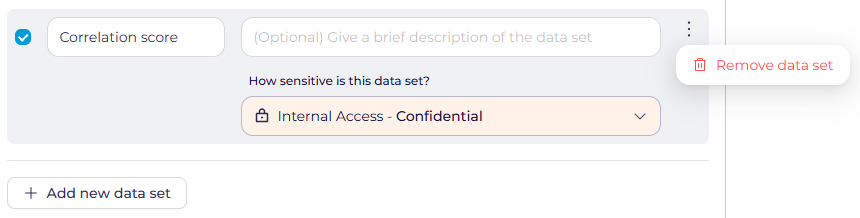
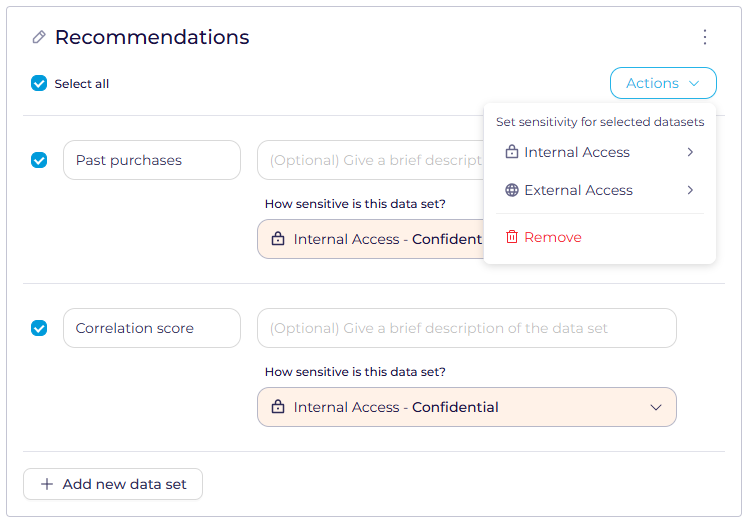
It's important to note that just because the chatbot might be externally accessible, the data available to the chatbot in aggregate might be considered Internally Sensitive. For example, while you want to share stock availability for individual items with your potential customers, you wouldn't want to provide your entire inventory in a machine readable format for your competition.
After you've created the first data set, you can add more data sets relevant to that data store by clicking "Add new data set". For example, a Store Inventory datastore might contain the data sets Store details, Available Inventory, and Store services schedule.
Once you're done completing the first data store, you can create additional data stores by clicking "Create new data store". As an example here, a single chatbot might have access to different data for different purposes, such as a Store Inventory data store, but also a Customer Behavior data store containing marketing information meant to support a Recommendation function.
As we now talk about the functions of the chatbot, click "Continue" when done and we'll start adding the chatbot Use Cases. If it would be helpful to see an example of a completed chatbot: Example Chatbot.
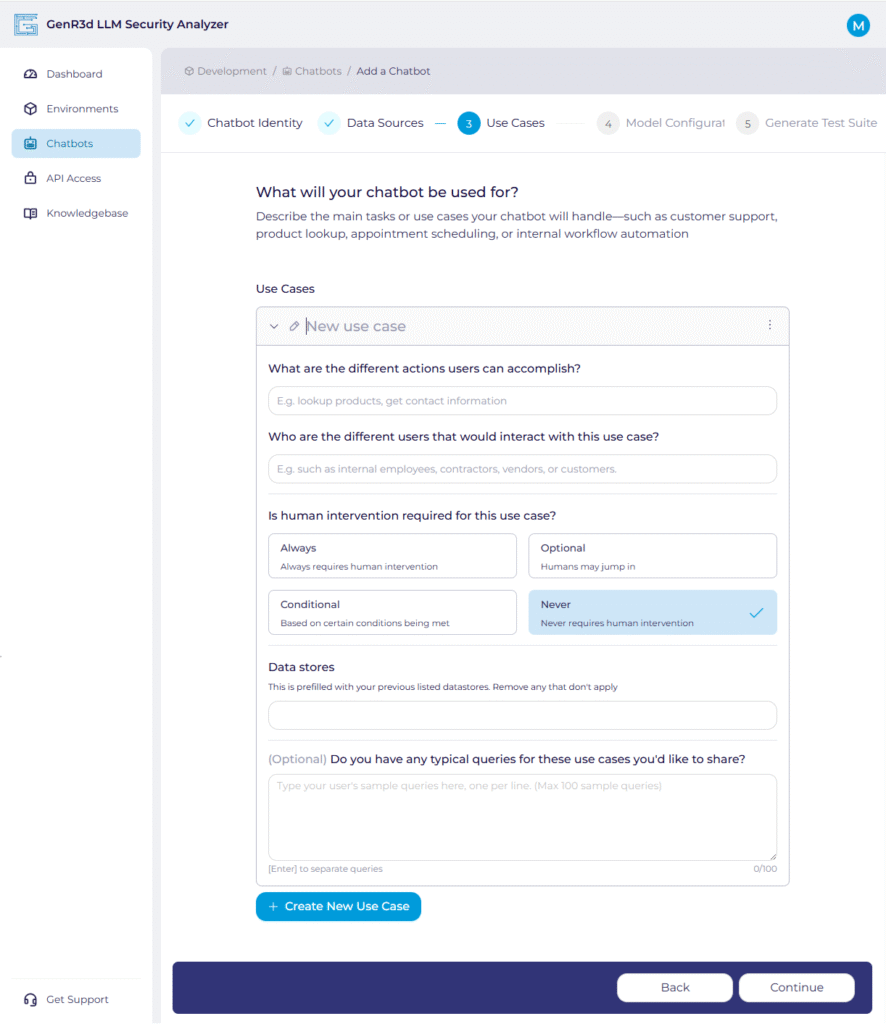
The third step in defining the Use Cases your chatbot are intended to fulfill. A Use Case can be defined as an objective or set of steps you expect your customers to use the chatbot to achieve. Depending on your industry or intended audience, this can vary from things like "Submit timecard", "Draft standard Non-Disclosure Agreement", "Check equipment status", or "Update inventory". Seeing these titles, you can quickly imagine what the expected outcomes are expected to be, who would be expected to try to achieve this outcome, and what data and system access would be required to achieve them.
To see an example of a completed chatbot, you can see it at Example Chatbot. Once you have added the relevant information, click "Continue".
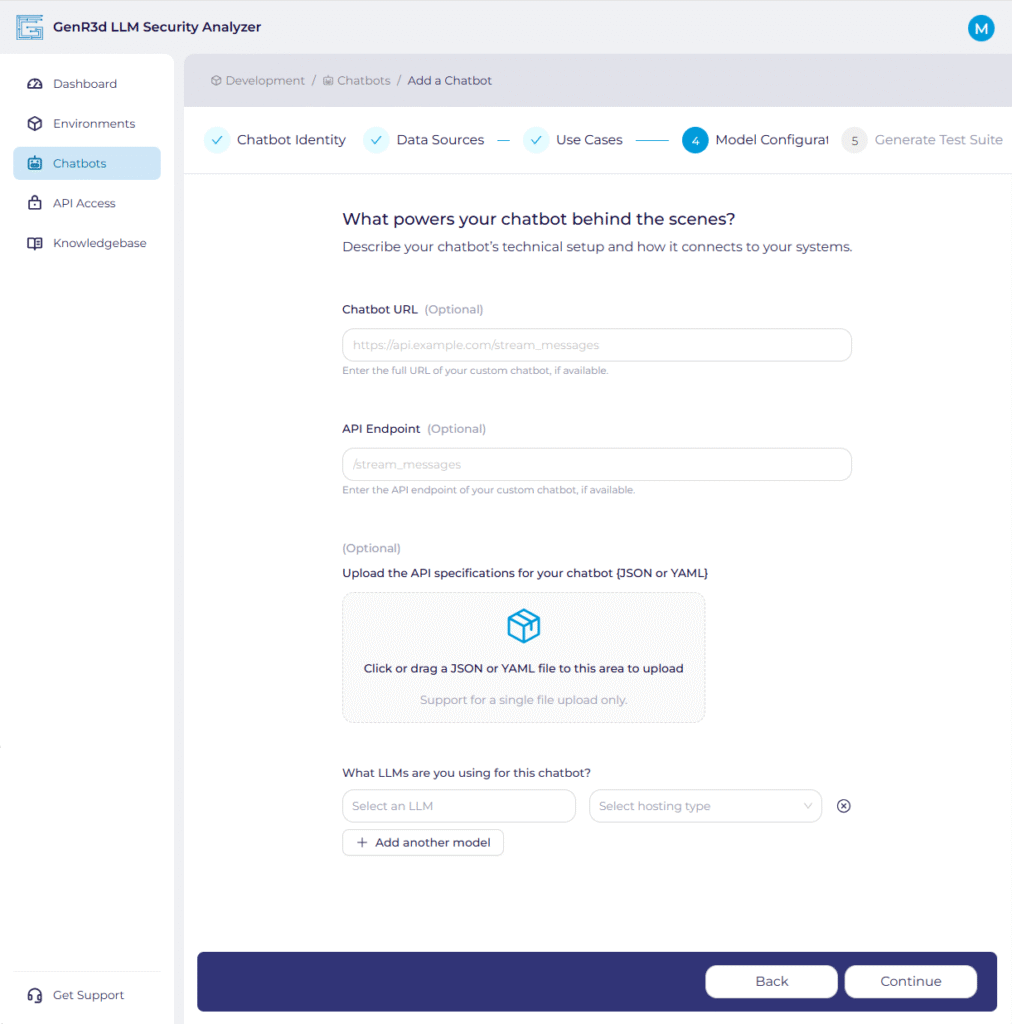
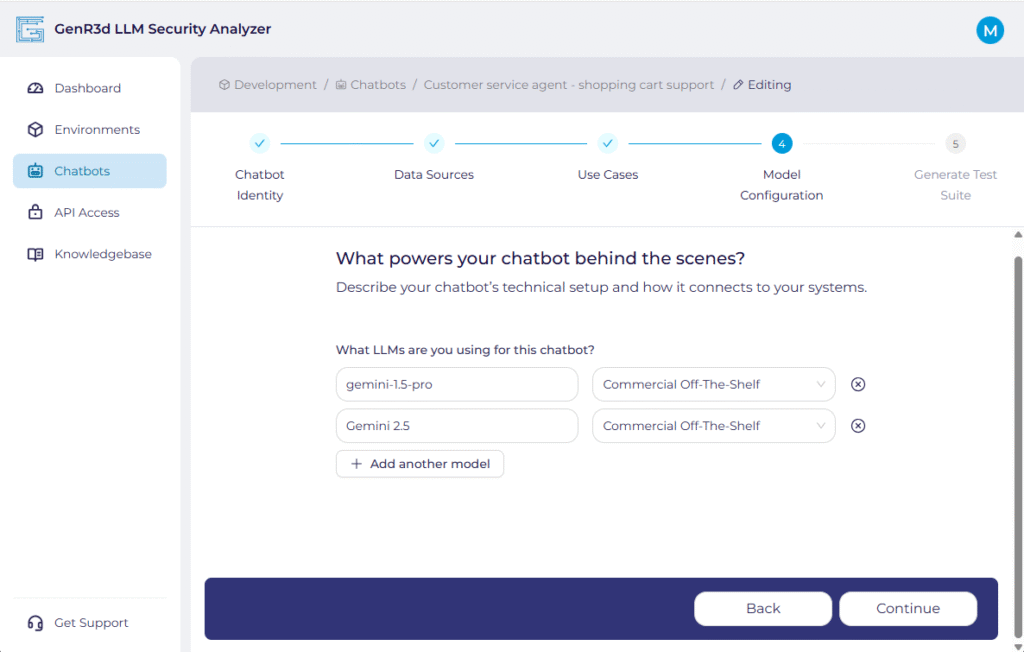
The fourth step in creating your chatbot is providing information on how to access it and what's under the hood. During the initial chatbot creation, connection information is. This is because you might not have the specific information available. For example, if you are going to hydrate a new chatbot in your development environment every time you test it, you will need to provide the Chatbot URL at that time, so putting it in now isn't helpful.
You're just about done! Once you have added the relevant information, click "Continue".
You have completed the information required for the chatbot. Now review the information you have provided. Everything is shrunk to make it more readable, but expand each of the Data Stores and Use Cases to make sure they are accurate. Once you're done your review, click the "Submit" button on the bottom.
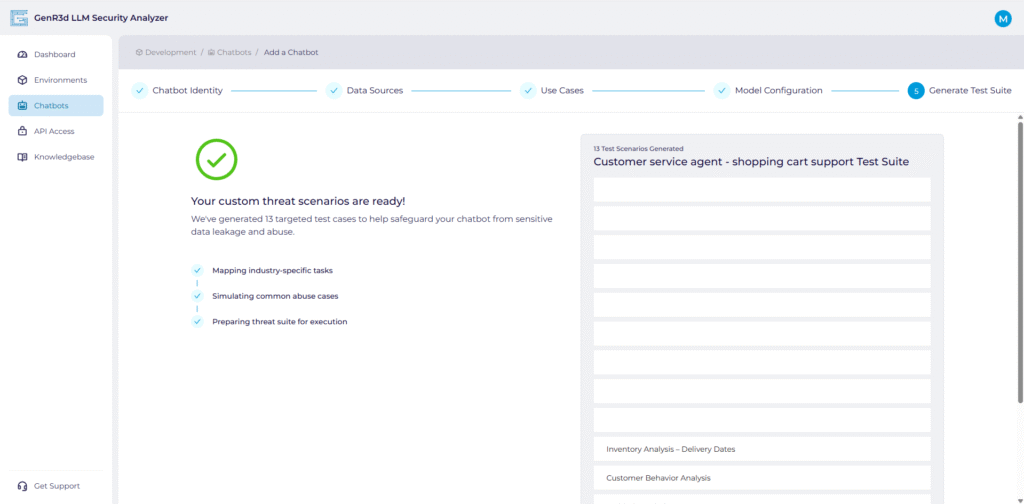
Once you submit the chatbot information, the system begins generating the security test suite, associating the Abuse Cases to your Use Cases and Data Stores. The system prepares a set of custom prompt attacks inside those Abuse Cases based on the information you shared.
Once complete, the system will provide you a list of custom threat scenarios associated with your chatbot. Now you are ready to start running scans against your chatbot.
In this knowledge base article we'll walk through the steps to creating environments in the GenR3d platform. But first, what is an environment?
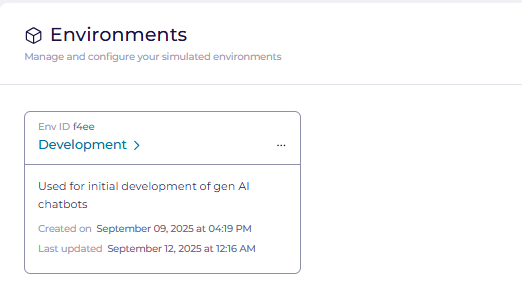
The term environment refers to a logical construct in which chatbots and agents of similar operational and security configurations can reside. This can be a literal segregation like in your CI/CD process where you have development, test, stage, and production environments; more operational segmentation such as different lines of business or reporting lines; or delineation by intended audiences such as internal for external.
The environment construct allows you to segregate your chatbots and agents so you can understand the implications of different Abuse Case successes for different chatbots. For example, you may have a chatbot in your "development" environment with a large number of successful Abuse Cases and accept this as that chatbot isn't published yet. But a chatbot in a "production" environment would demand more attention to the successful Abuse Cases since this is actively used by your customers. Your can also then your reporting to executives to focus on real risks to published chatbots instead of including successful Abuse Cases that weren't risks to real business data (yet).
So let's create an environment. Click the Environments header on the lefthand navigation and you will see all your current environments. To create a new environment, click "Add an environment".

Here you give your environment a name and a description. As mentioned above, this can mirror your application deployment environments (e.g. Dev, Test, Stage, and Prod) or be another way you want to delineate between your chatbots.
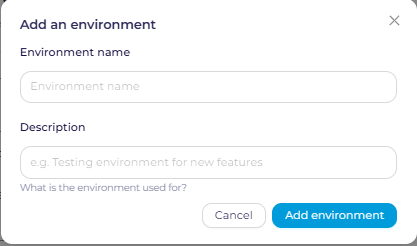
After you are done, click "Add environment" to save the new environment to your account. Once this is complete you will see the environment added in the window.
Now that you've created an environment, you can add a chatbot to your account. Chatbots only exist inside of environments, so this is a necessary first step before you can get to scanning your generative AI powered chatbot for risks associated with Abuse Cases.
If you have any questions or issues with this process, please contact us at support@generativesecurity.ai and we will respond to you within the published SLAs.
In this knowledge base article we'll walk through the steps for rotating your API key used in your CI/CD pipeline automation. We assume you have already created an API key, and need to rotate it due to company policy or delete it due to security factors.
Your current API Access screen should contain a single key to begin with. Each user is only allowed to have 1 active key at any given time.
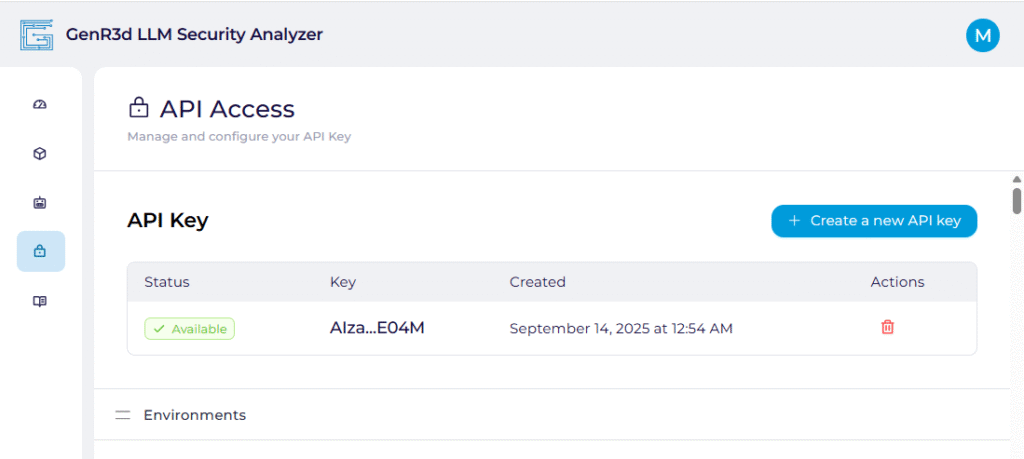
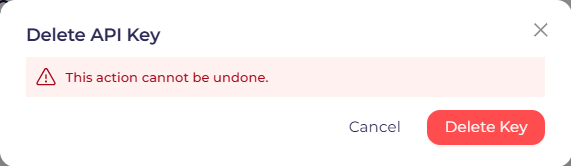
To delete your key, click on the red trash can underneath the Actions title for the Available API key. This will then pop up a notification window announcing this action cannot be undone, and requiring you to confirm you want to delete the key.
When you click on "Delete Key" you will see a notification that the key is being deleted.
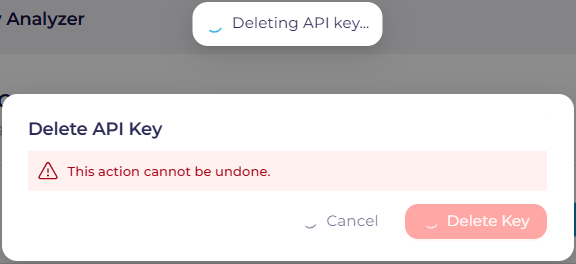
Once that is complete, the API Key window will return to the original state with no active API keys.
Now to recreate the API key, you can follow the steps at Create an API key for your CI/CD automation. For brevity purposes, you can click on "Create a new API Key", make sure you write down or copy and save the provided API key (it will not be available again), and then begin using it once you've clicked "Done".
If you have any questions or issues with this process, please contact us at support@generativesecurity.ai and we will respond to you within the published SLAs.
In this knowledge base article we'll walk through the steps to create an API key to be used for automation purposes by your CI/CD pipeline or other scripting platform. API Keys are not required to use thew GenR3d LLM Security Analyzer, as everything can be accomplished through the GUI. However, it is highly recommended you integrate scanning of your chatbots and agents into their deployment pipelines, using the provided automation. The documentation for how to use the automation can be found in the API Reference guide or in the API Access menu in the GenR3d platform.
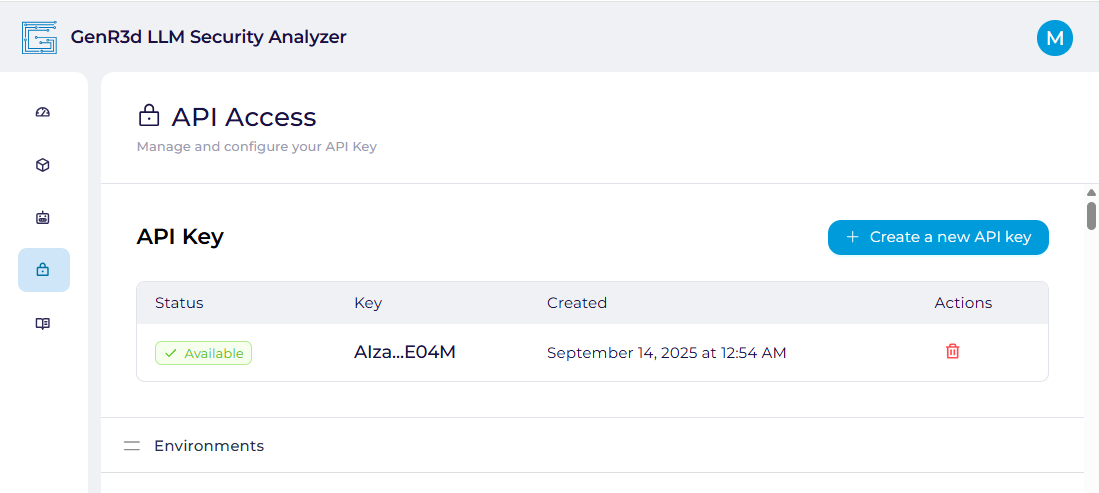
To start, when you click on the API Access header on the left hand navigation you will see a screen showing no active API keys.
From here, click on "Create a new API key" on the right hand side of the screen. When you do, you will see a "Creating API key" notification. Once the API key has been created, a window will show you the newly created API key.
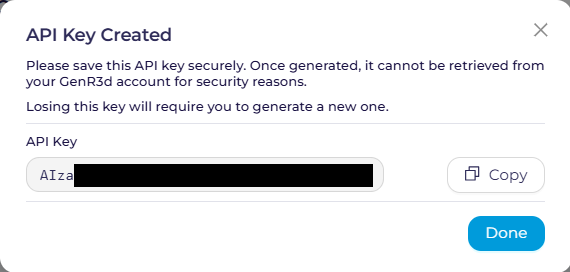
You must copy and save or write down this API key immediately.
The API key will not be accessible again in full once you click "Done", and you'll have to delete and recreate a new API key.
Click "Done" once you've saved your API key somewhere it can be retrieved, you'll see the previous screen with the API key partially visible. This is so you can validate you have the complete API key later.
We STRONGLY recommend you do not hardcode this API key into your automation, but instead save it in a password manager, secrets manager, or some other secure location that is accessible through your automation to pull only when it is necessary to login to the system. For example, with GitHub Actions you can follow the Using secrets in GitHub Actions pattern, or if you're using AWS and GitLab you can follow the Use AWS Secrets Manager secrets in GitLab CI/CD pattern.
The templates we provide require you to store the API key in a secrets manager.
In this knowledge base article we'll outline the service level agreements (SLAs) for published support tiers. Additional support SLAs are available - please contact support@generativesecurity.ai or your direct contact for more information.
| Tier | Email Response Time | Phone Response Time | Setup support |
|---|---|---|---|
| Starter trial | 3-5 business days | N/A | N/A |
| SMB | 2 business days | N/A | N/A |
| Enterprise | 9/5 support | 9/5 support | N/A |
| Support Plus | 2 hours, dedicated support rep | Same day response | 5 hours |
For more information regarding what is available in each license tier for the the GenR3d platform:
| Tier | # of users | # of chatbots | # of agents | # of scans |
|---|---|---|---|---|
| Starter trial | 1 | 1 | 1 | Unlimited |
| SMB | 15 | 5 | 5 | Unlimited |
| Enterprise | Unlimited | Unlimited | Unlimited | Unlimited |
When creating a new account, your account will be given a 30 day free trial at the Enterprise tier. After 30 days, your account will become limited to only viewing existing chatbots, agents, and scan results, and you will not be able to create new chatbots or run new scans.
To sign up for your desired tier, please contact sales@generativesecurity.ai before your 30 day trial is complete.
In this knowledge base article we'll walk through the steps to create an account on the GenR3d platform, including password constraints, how to setup MFA for your account, and the information gathered during the creation process.
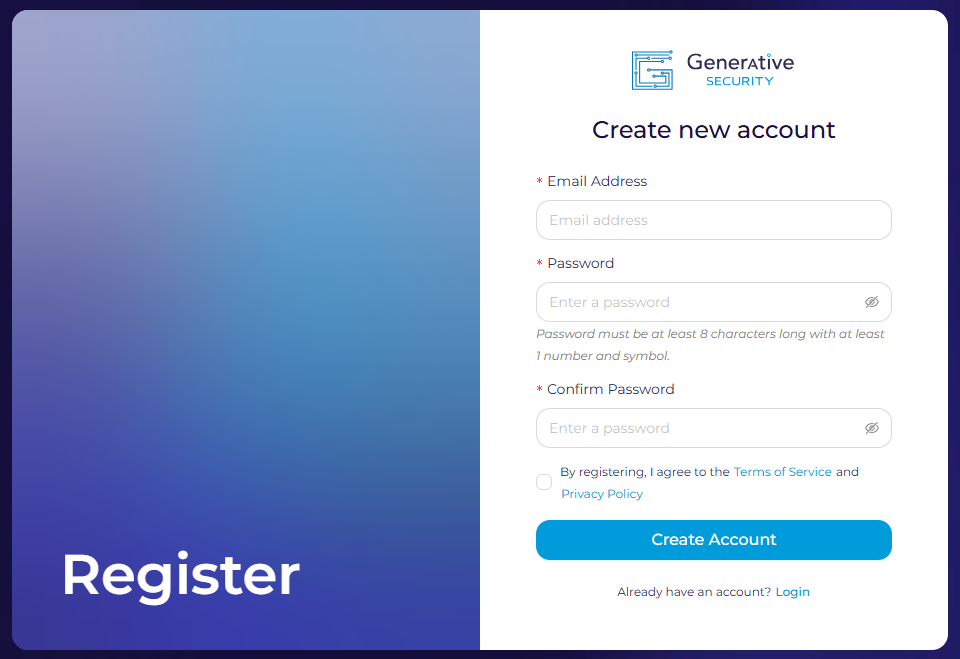
When creating a new account, there are a few important things to get right. First, your email address needs to follow the normal format, nothing really special there. We do support the "+" symbol in your email (e.g. michael+example@generativesecurity.ai).
For the password, the following requirements must be met
After you confirm your password and agree to the Terms of Service and Privacy Policy you can click "Create Account". From here you will be sent an email to verify your account.
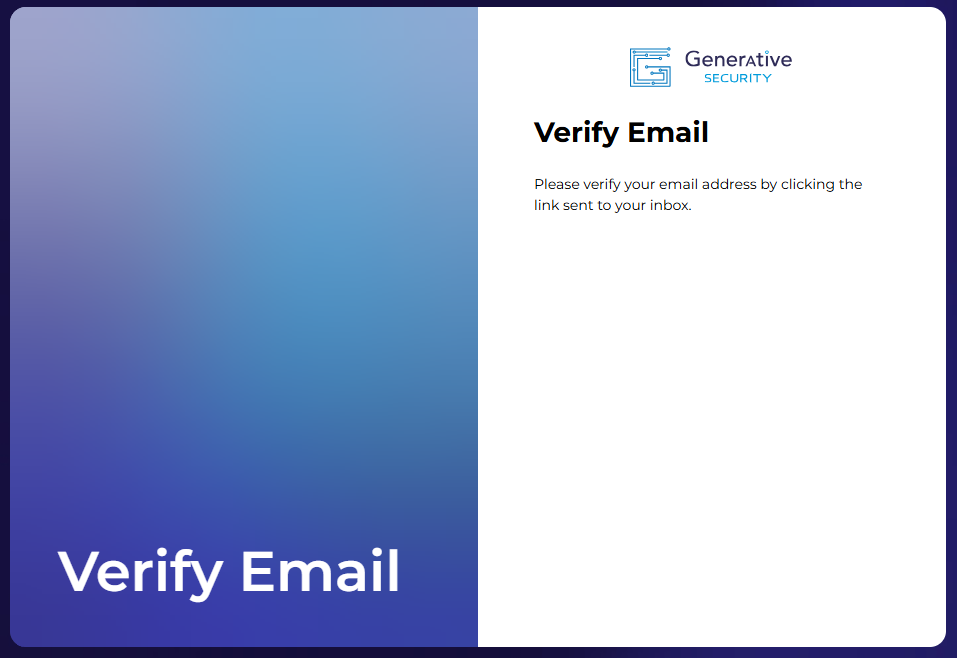
When you click on the click to verify your email, you will see a verification message.
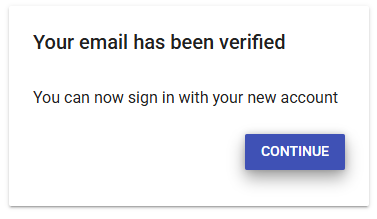
Click continue to then create an MFA token using an authenticator app like Google Authenticator.

As a security tool, multi-factor authentication is mandatory for access to the GenR3d LLM Security Analyzer platform.
Open your authenticator app and scan the QR code or enter the secret code provided. Then enter the MFA code generated by the app to complete the authentication registration.
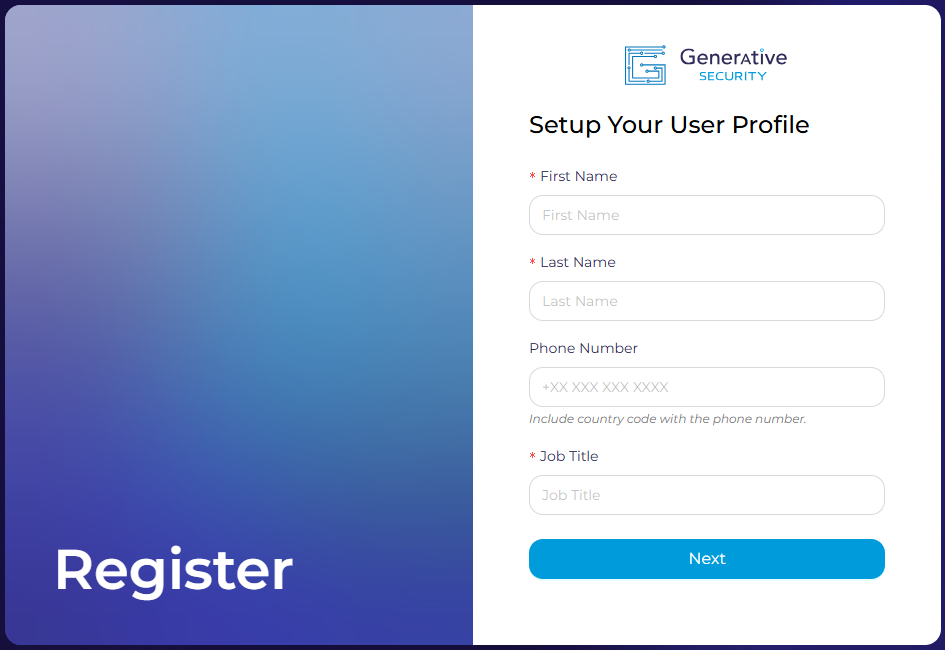
How you'll be able to complete your user and company profile. Beginning with the user profile, the first name, last name, and job title fields are mandatory. Your phone number is optional and is currently only used in case of account issues to verify you.
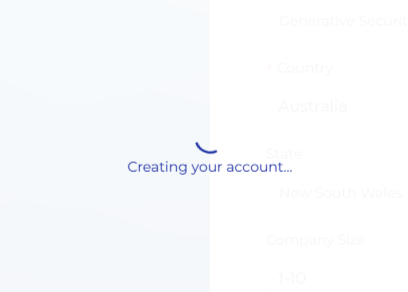
After completing the user profile, the company profile is next. The company name and country are mandatory fields. If you wish to share the additional information such as your state, company size, and Industry this will help us tailor our services to your needs now and in the future.

When you click "Submit" the system will begin creating your company account in the GenR3d platform.
If you see an error in creating the account at this stage, it is possible there is already an account in your company's name. If this occurs, please contact us at support@generativesecurity.ai. We will try to help add you to the existing account or create a new tenant for your needs depending on your situation.
When successful, you will be sent to your new dashboard page where you can create Environments and Chatbots to begin analyzing your generative AI powered applications for industry specific risks and threats.
If you have any questions or issues with this process, please contact us at support@generativesecurity.ai and we will respond to you within the published SLAs.